ATX 20 pin to Sawtooth 20 pin adapter
Do you need more power or want to replace a dead PSU in a Sawtooth?
ATX PSU’s are cheaper, more readily available, or rated higher than the OEM sawtooth PSU.
Especially for highly modified/heavily upgraded towers, a new, stronger ATX PSU can help realize the performance potential that has been installed.
When I changed the PSU in my Sawtooth for a 500W ATX, I realized stability and performance that had previously been “lacking” (not really the right work, but we’ll go with it).
There is only a small wiring difference that needs to be overcome to use an ATX PSU.
After that, the upgrade is an easy one.
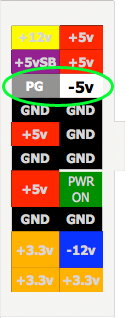
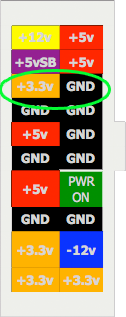
Lets have a look at the two different wirings between the ATX connector and the Sawtooth connector:


ATX 20 Pin Connector Sawtooth 20 pin connector
Looking at the connectors, we can see that there is only a two wire difference.
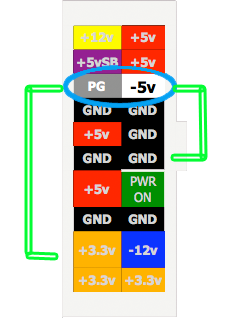
What needs to be done, is to abandon the PG and the -5V from the ATX PSU, and jump +3.3V and Ground (respectively).
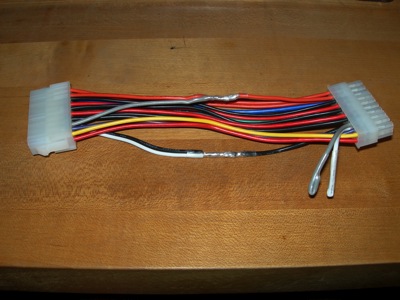
As in the picture at the top of this page, the gray (PG) and the White (-5V) are simply cut (on the PSU side) and sealed with shrink tube.
Next, simply split any +3.3V lead, and connect it to the gray lead on motherboard side of the wiring.
In a similar fashion, a Ground is split, and connected to the white lead.

Once this is accomplished, the wiring from the PSU will now match the needs of the Sawtooth motherboard.
When I made the adapter, and later rewired a PSU, prior to soldering the wires together, I placed shrink tube on the wires, and slid it away from the soon to be soldered wires.
Once the wires were soldered, I then slid the shrink tube over the solder joint and shrank the tubing to seal the connection.
If you forget this step, you will need to cover the soldered connections with electrical tape to prevent shorting.
MAKE SURE YOU DOUBLE CHECK YOUR WORK!
ALSO, the wire colors may vary with PSU manufacturer, so verify pin location before proceeding!
Cut the red one?
Or is it the blue one?
Wednesday, September 16, 2009

