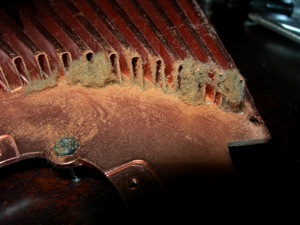
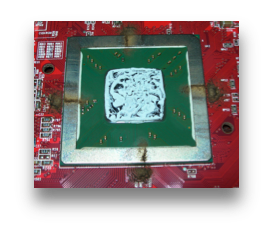
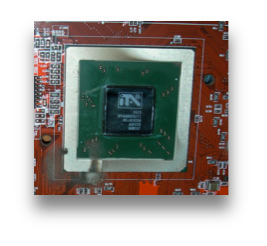
Graphics Card Cleaning and Thermal Compound Replacement
You aren’t cool if it doesn’t cool....
Sunday, January 2, 2011


After years of faithful service, many graphics cards crap out due to neglect.
The temperatures that accompany performance GPUs are brutal, and will bake the thermal compound into submission.
This, of course, has disastrous effects, resulting in artifacts, system freezes, and ultimately, the demise of the graphics card.

Thermal compounds, especially those of years gone by, were only designed to perform for 3-5 years at best.
As most graphics cards in AGP machines are well past that in service time, the GPU is not being properly cooled due to reduced thermal conductivity of the thermal compound.
Add to this accumulated dust, grease and grime on the components and the performance and longevity of the graphics card is in danger of being compromised.

Anyone who wishes to continues to use their beloved machine should take some time and perform preventive maintenance; cleaning and replacement of thermal compound.


!!!  CAUTION  !!!
One should have reasonable mechanical competence and manual dexterity 
before attempting that which follows.

It’s not that this is terribly difficult, it’s just common sense! ☺


Required tools and materials:

    #2 Phillips Screw Driver
    #1 Phillips Screw Driver
    Forceps or Needle Nose Pliers
    Static free Nylon brush
    Canned compressed air or air compressor
    Soft, lint free cloth
    Cotton swabs
    Thermal Compound removal solvent
    NEW Thermal Compound-  Arctic Cooling MX-3 is HIGHLY recommended!
    Static free work surface

Optional tools and materials:

    Magnifying Glass
    PCB and Electronics cleaning solvent (spray)
    Spray lithium grease
    Static wrist strap or static free gloves


OK.
You have your graphics card removed from your machine, and you have an uncluttered, clean counter to work on, as well as the required tools, materials and ability.

If you lack the latter, the ability to read and follow instructions, as well as an adventurous, diligent spirit may be used in substitute....

Let’s begin.

The first thing to do is to use compressed air to remove gross dust accumulations and dirt.
Move outside or open a window and blow outside.
Otherwise, vacuum your room afterwards, but DON’T VACUUM THE GRAPHICS BOARD!!!!

Vacuums create deadly static and will brick your card; Static will KILL it.

Once blown, use your static free nylon brush to carefully, gently, loosen stubborn dust and dirt.
Blow again.


Remove the fan/heat sink assembly.


Remove the old thermal compound from both the heat sink and the GPU.

Use thermal compound removal solvent, 99% isopropyl alcohol or acetone free nail polish remover on a soft, lint free cloth to wipe and remove all old thermal compound.
If thermal tape is used, remove all layers of the tape and adhesive.

An example of thermal tape and removal is shown here.
Cards that are assembled with thermal tape may require heating with a hair dryer to warm and loosen the adhesive. The Radeon 9700 Pro is an example that may need this.

Use cotton swabs to remove any compound from around resistors or the edge of the contact pad on the GPU.

If you wish, use canned PCB solvent to thoroughly clean and degrease the entire board.
This can be especially helpful if the card was used in a machine who’s user smoked cigarettes.

Once you are done, a result resembling the shining example below should lay in front of you:


From here, let’s remove the fan from the heat sink.
Using a #1 phillips screwdriver, remove the retaining screws for the fan.


Pull the fan out from the heat sink.


Now, use cotton swabs moistened with alcohol or citrus cleaner to wipe the fins clean.
Pay special attention to the underside of the fins.


If you wish, or if your fan was a bit noisy, you can lubricate the fan using spray lithium grease.
Lift the manufacturer’s sticker from the rear of the fan.
This will reveal the center hub and bearing, which is where you want to apply a small amount of lithium grease.


Wipe off any excess grease, and reapply the sticker.

Next, clean the heat sink thoroughly.
If a plastic housing encases the heat sink, remove the housing using the appropriately sized screw driver.
Use any combination of compressed air, brushing, wiping, etc., to remove all dirt, dust and grease from the heat sink and housing.

Now that all is disassembled and clean, you should have something like this in front of you:


Next, reassemble the fan and heat sink assembly.

“HOW?” you say?
In reverse order that it was disassembled, silly!

Once this is done, apply a dab of new Arctic Cooling MX-3 Thermal Compound (or other, using the manufacturer’s recommendations), and apply thermal compound to the GPU contact pad.
Also apply compound to the VRAM chips, IF the heat sink contacts the VRAM chips.


After confirming that sufficient thermal compound has been applied (covers surface of contact pad and VRAM chip, but does not ooze over), reassemble the heat sink assembly to the graphics card.

At this point, your graphics card should be returned to a completed state resembling it’s former glory when new (only better, because Arctic Cooling MX-3 helps cool better and lasts 8 years instead of three).

There should be NO PARTS LEFT OVER!!!!!

You may now reinstall the card into your machine, and it should perform without issue, giving you peace of mind knowing that the GPU is being properly cooled.

For those who are sticklers for completeness, you may also wish to remove the I/O port cover plate and clean behind the plate.

Remove any screw that may be holding the plate to the graphics board:


and then remove the lugs on either side of each port:


The plate is now free from the card to allow final cleaning.


Well, that’s about it, generally speaking.
For a bit more on specific card models, see the following:

Radeon 9800 Pro
Radeon 9800 XT (applies to Radeon X800 XT and Radeon X850 XT cards)

9AE7FE0E-0CF2-4A7C-8003-489B282582BC.htmlC874D84E-96DD-4DFF-9566-7C66BE065BB5.htmlAF6A8D44-7864-4F5A-A45A-DB56A8663B45.htmlshapeimage_2_link_0shapeimage_2_link_1shapeimage_2_link_2