Moving the Home Folder
It is recommended for optimization of system performance to keep plenty of free space on the startup drive.
I follow a “rule” of maintaing at least 50% capacity as free space.
This allows plenty of room for OS X virtual memory requirements, and keeps files within easy reach for fast system response.
It also helps to reduce file fragmentation.
If one has a large capacity drive, this isn’t usually a problem, but with small capacity drives, or in the case of large photo, movie and music collections, free space can quickly become an issue.
The solution to this issue is to move files to a second hard drive.
The easiest way to move all files, keep the system drive for OS X and applications only, and remove the need for alias folders or other hassles, is to move the Home Folder.
Follow these instructions to move your Home folder.
1. On your System Drive in your User folder, there is a house icon as pictured above. This is your home folder. Because it is your active home folder it has a house icon assigned to it.
Copy this folder to a new or second hard drive by simple drag and drop. This moves all enclosed files and folders to the chosen volume, copying the content, while leaving the original in place. The copied folder will not have the house icon yet, as it has not been assigned as the active folder (yet).
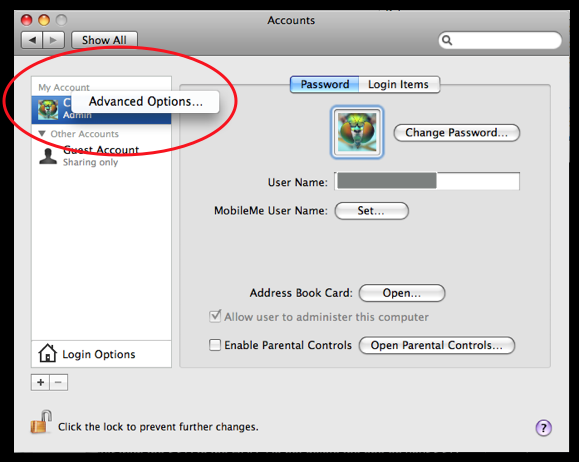
2. Open System Preferences and then open the Accounts pane.
3. You now need to unlock the Accounts pane. Click on the padlock below the accounts list window, and enter your Admin password.
4. CTL-click (or right click) on your admin account name to invoke the Advanced Options menu. Select “Advanced Options...”.
5. A new pane with advanced settings will open, along with a warning. Don’t worry about the warning, unless you start changing more than you need to.
The only setting that needs to be changed is the Home Directory field (circled in Red below). This is the OS X path that is needed for OS X to locate your home folder.
The Accounts/Advanced Options window appears as pictured below:
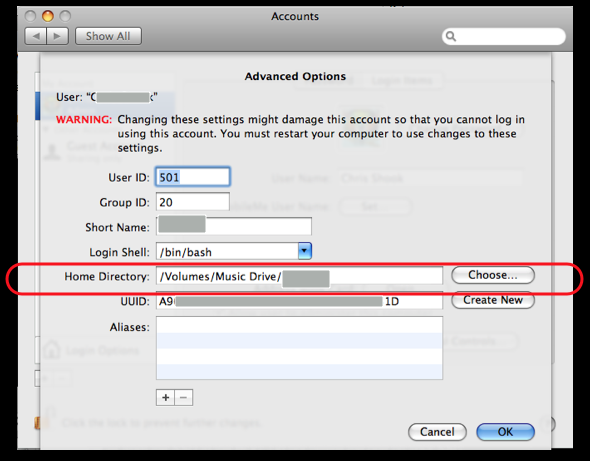
6. To set the new Home folder location, click “Choose....” as seen in the right side of the circled field above. Browse to the home folder that you moved to the new drive. Select the new location and the Home Directory path will change to reflect the new path.
7. Now you need to restart the computer and login as usual. You should now check the home folder at the new location, and you should see a House icon. If the House icon is present, you have successfully moved and activated your Home folder.
From now on, when you save to “Documents”, Movies, Photos”, etc., all items will be placed in the new location in the corresponding folders within the Home folder.
You may now delete the contents of the old home folder sub folders to free up the space.
No other change is required. Your original drive will still be the default for applications and system files. The Home folder still on the original drive is there in case something happens on or to the hard drive.
Make Space for Performance
Sunday, January 9, 2011

